MapleEngineer

joined 2 years ago
MODERATOR OF
 

When you're a maple syrup producer you sometimes get to the next maple syrup season with maple syrup still on hand. When that happens at our house my wife boils it down carefully to make maple sugar.

She has this jar sitting on her coffee table so that she can use it in her coffee in the morning. We use it for baking, candy and ice cream making, and to add some extra depth of flavor to savory dishes.


I currently have everything from ATTINY9 and 10 chips in SOT23-6 packages, to ATMEGA328Ps and PBs and their Chinese LGT8F328P clones to ATMEGA2560s, some STMs, some PICs, some Raspberry Pis, and some ESPs of various flavors. There are also Py boards in there and some that I don't even remember.

I mostly work with AVRs and ESPs but the brothers I work with who own a small custom electronics business use PICs so they have been encouraging me to branch out.

I had been using BascomAVR to program the AVR chips but following the author expiring the license I had paid full price for for asking questions in the forums I have switched to Great Cow Basic. It can compile to a large number of MCUs, not just the AVRs so I'm expanding my repertoire.

Are you new or experienced? What MCUs and microcontrollers do you use? Which ones are you interested in? What languages do you program them in? Which IDE do you use? What projects are you working on?


Sometimes when I'm sitting on the couch and start to feel a bit snackish for something sweet and salty I make this stuff.

I throw a bunch of pecan halves into a frying pan, add a bunch of maple syrup (not quite to cover the nuts, a splash of vanilla (preferably Madagascar Bourbon Vanilla in bourbon, I love the flavor), and a healthy pinch of salt.

Then...I turn on the first and give it a mix until everything is dissolved. I carefully boil off the water until it starts to dry and and get really sticky then I turn it out onto a piece of baking paper and let it cool down.

This is the end result. The matrix of this confection is solid maple sugar.

You can add butter, too, but that tends to make it more chewy. You can add a bunch of butter and some heavy (whipping) cream and you end up with @$% delicious ice cream sauce.


Most of the projects I design start out on solderless breadboards. The one in the bottom of this picture is a ROM switcher and reset circuit for a Commodore 64 that I'm working on. This circuit will fit inside the footprint of a 27256 ROM chip in a 2364 to 27256 ROM adapter.

Other projects are larger like this early prototype of my maple syrup machine room controller, the SapMaster...

image

or this...something...that I was doing with an ESP32 and a Raspberry Pi Zero W.

image

Over the years I've collected a number of solderless breadboards. Some I bought myself and others came with kits that I bought. A number of them came from Hacker Boxes when I had a subscription before the pandemic. I had the delivered to a UPS store in Ogdensburg, NY and drove over and picked them up once a month. Hacker Boxes are cool. Definitely check them out.

Some of the solderless breadboards in my BREADBOARD drawer were cheap, Chinese knock-off breadboards. They had...issues...

image

not to mention the fact that the contacts were SUPER cheap. They often didn't line up well with the holes and prevented pins from being plugged in. Dupont wires and header strips were a BIG challenge and when plugging in a header strip the contacts often stretched and didn't spring back properly.

I finally decided that it was time to replace all my cheap breadboards with better ones.

The cheap ones can be bought on AliExpress for CAD$2. The better ones cost in the neighborhood of CAD$10. I spent some time doing research and talking to friends in the electronics business and settled on Global Specialties (pictured above.) Just about any of the brands available from Digikey or Mouser will be the same quality.

The contacts are nickel plated phosphor bronze and are rated for 1.5A at 36V.

I've switched my prototypes over to the new breadboards and am very happy with how the feel.

1
submitted 2 years ago* (last edited 2 years ago) by MapleEngineer@lemmy.ca to c/soldering@lemmy.ca
 

A pair of friends, brothers, own a small business manufacturing custom PCBs and systems. The older of the two has always done all of the hardware and the younger the software. The older brother had a heart attack several years ago and has had a shake and weakness in his right hand ever since. He can no longer solder small components so I have taken over that function for him. I love soldering and I love the challenge.

This is a PIC microcontroller that I soldered onto a breakout board for them. It's a 0.5mm pitch (0.5 mm from the center of one pin to the center of another pin) TQFP package. I used a Weller WESD51 soldering station with a PES51 soldering pen and an ETGW angled, cupped soldering tip.

image

I do all of my fine soldering under an Olympus SZ40 binocular microscope that I bought for $200 a couple of years ago from a microscope shop in Montreal.

image


In early 2020 at the beginning of the pandemic my team was laid off by a company that had made some bad decisions, found itself overextended, and panicked. Needing to find something to occupy ourselves my hand and I decided to built the pot rack that I had been promising my wife for 20 years.

Here is how we did it.

This is my hand. She first visited us two years before to make maple syrup and stayed for a month. She visited three or four times then came to stay in the spring of 2020, again to make maple syrup, and ended up stuck at our homestead during the initial covid panic and travel restrictions. She was an aircraft maintenance quality manager who had never welded before. This is the project where I taught her and she cut her teeth.

The pot rack is a simple rectangle with two cross bars. It is constructed of 2" x 1//4" cold rolled flat bar. We started with the outside rectangle sitting on the floor of my shipping container workshop.

image

Next, we added the cross bars. The cross bars will prevent the side bars from flexing under the weight of the pots and provide additional hook space for pots.

image

Then we added little flats at the corners for the lifting eyes to which the chains would attach.

image

After some grinding (a lot of grinding) and a trip to the hardware store for some chain and carabiners we carried it into the house and hung it up in the kitchen to see how it looked.

image

It seemed to be in the right place and worked well with the Ikea adjustable hanging lights.

The next thing we needed to figure out was what we were going to use as hooks. I looked at a bunch of pictures of pot racks and searched for hooks that would work with ours but didn't find what I was looking for. We decided to make our own hooks.

I modeled the tool and jig on one that we use to bend loops in the 9 gauge high tension galvanized fence wire that we use to support the mainline of our maple syrup connection system.

image

The hole goes over the big pin and drags the wire around forming it into the loop.

This is what we came up with.

image

The 1/4" rod we're cold forming into the hooks is inserted as shown. The threaded rod clamp holds it in place while the initial curve is formed on the end.

image

image

We then slide the rod down, reclamp it, and bend the second bend, closing the loop.

image

Finally, we move the tool down to the end post and bend the hook. They look like this when the bending is done.

image

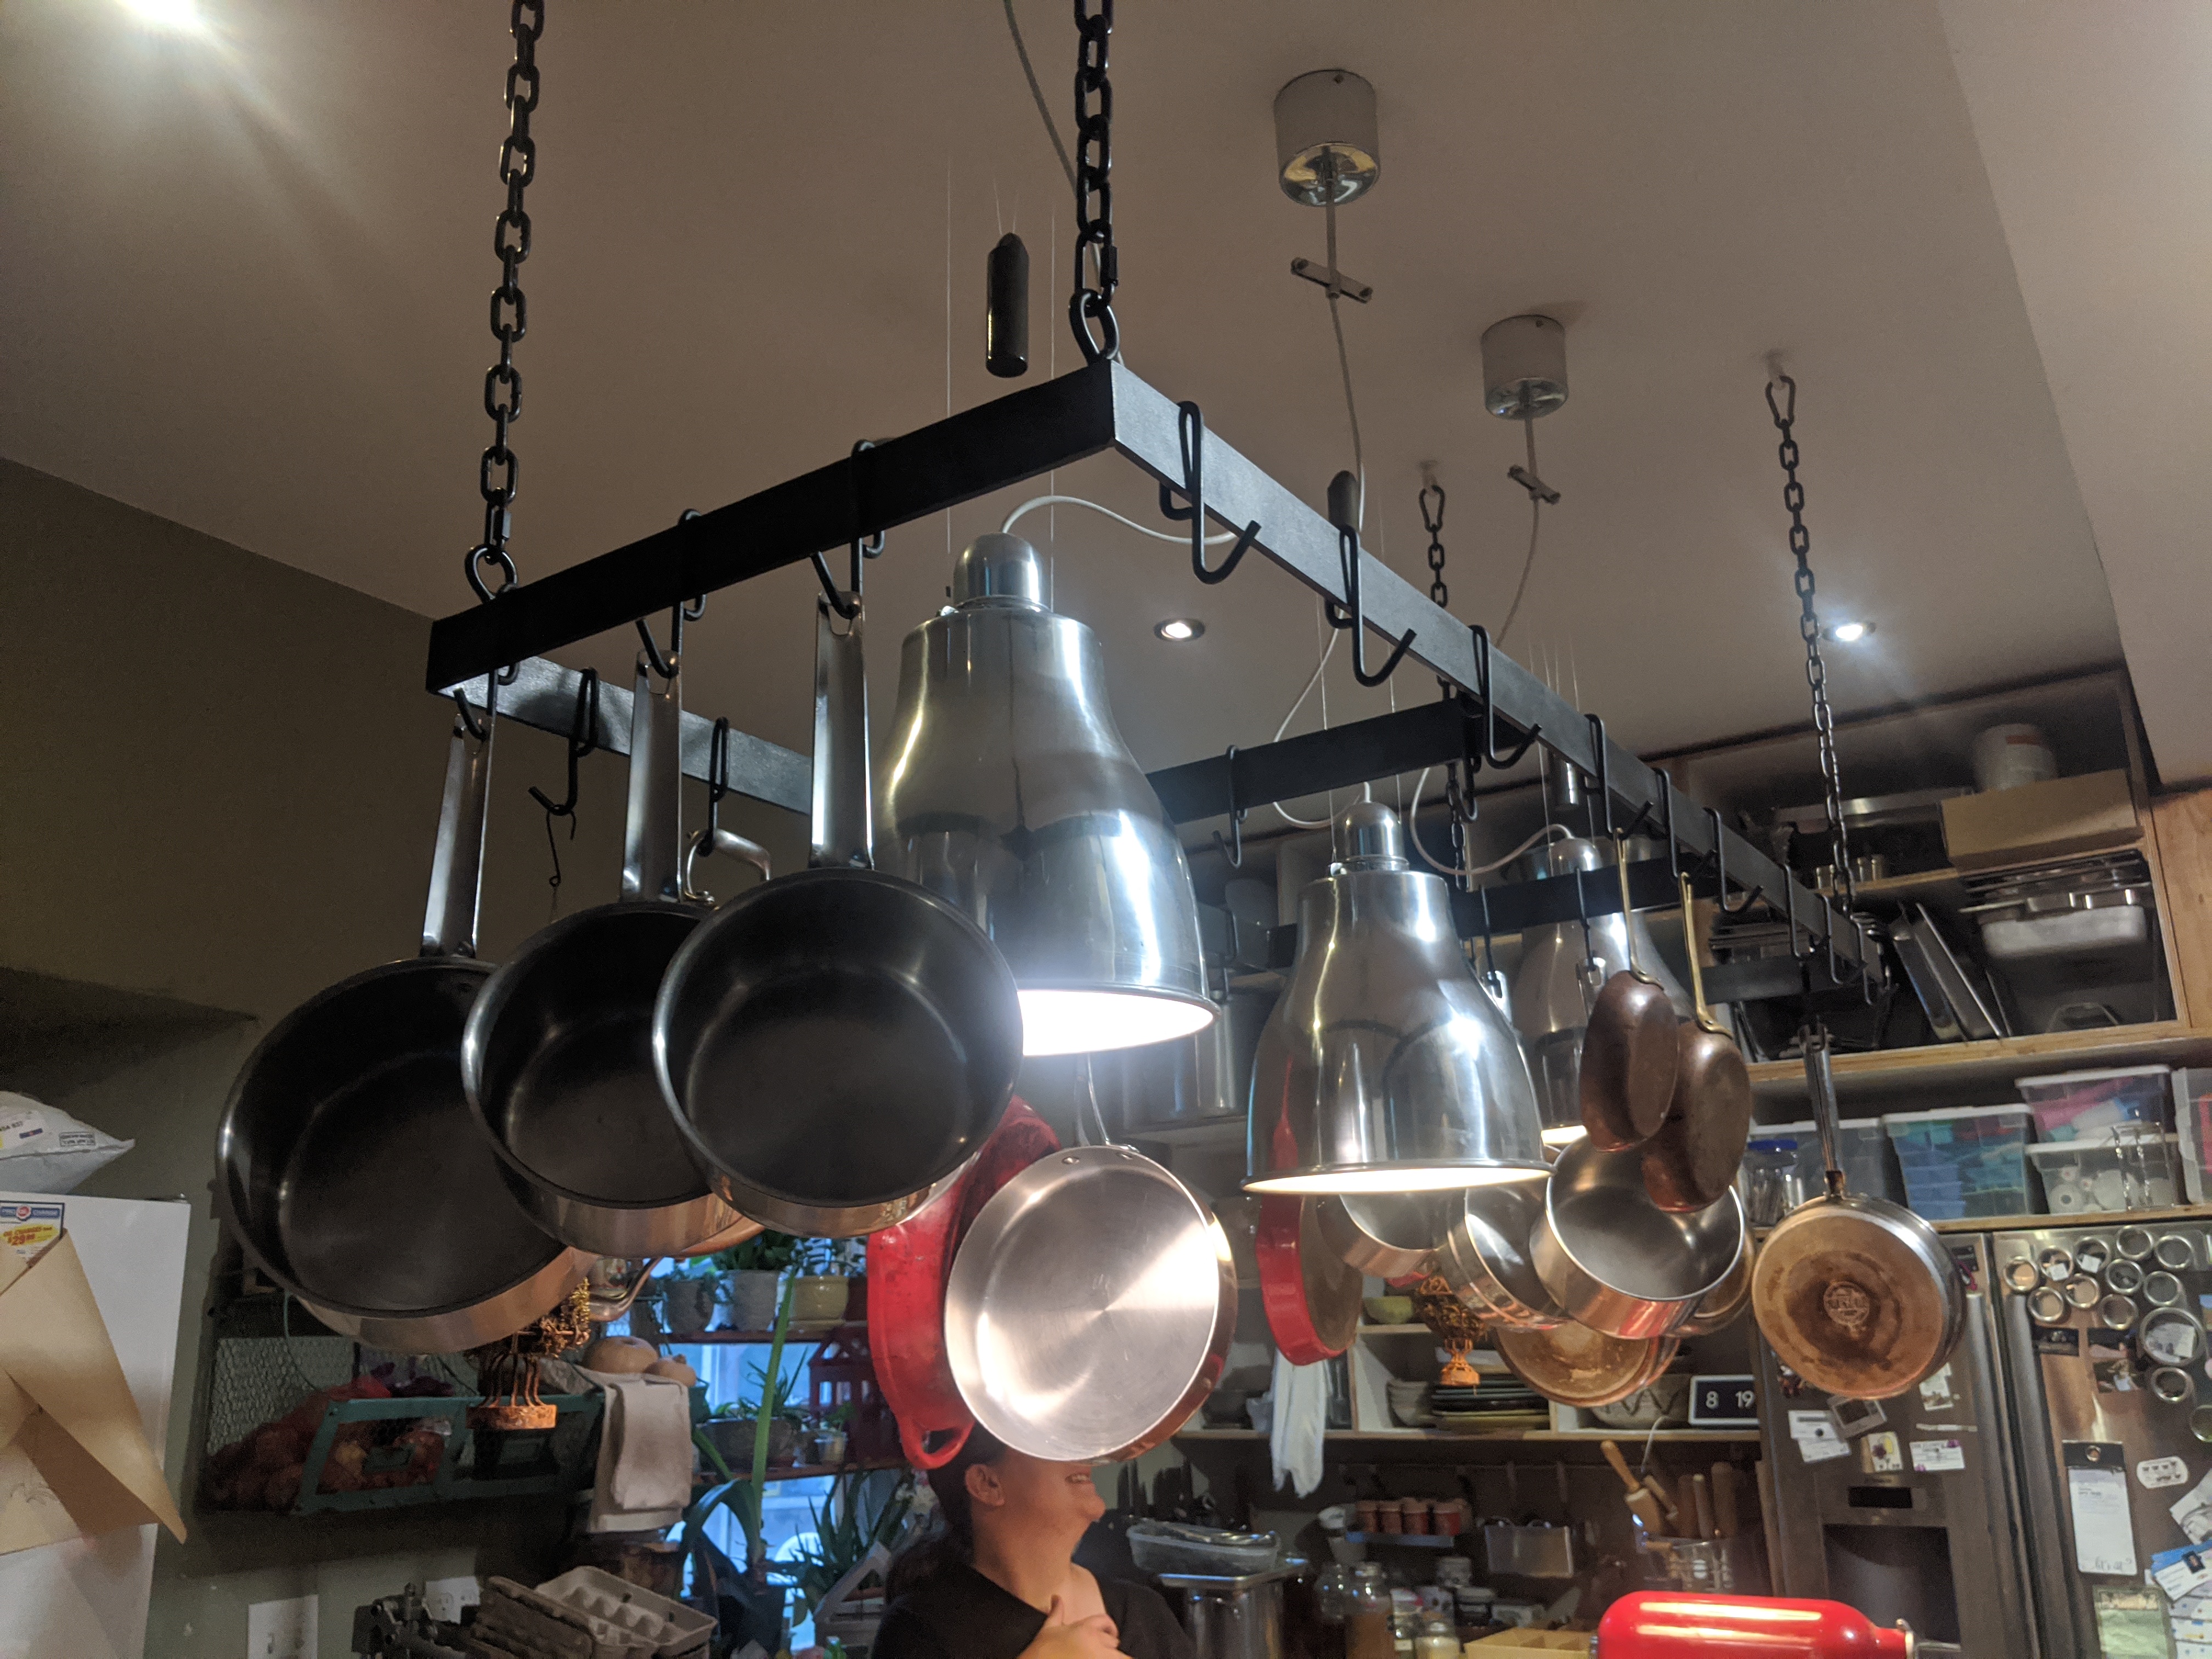
We used two bottles of gun bluing to turn everything black, rubbed everything with a mix of mineral oil and bees wax, hung it back up in the kitchen, and installed the hooks and bent them closed.

image

image

My wife was quick to add pots. Now the only problem is that I bang my head on the pots when I'm using the butcher block the pot rack hangs over. I've figured out which pots I can hang on the side that I work on and that if I hang them so that they hang away from me I can work under it with very little pot/head interaction.

image

Up next...replacing the round maple legs under the 850 lb maple butcher block with a matching welded steel frame.


The MigMaster 253 is an amazing welder. It's designed for use on a factory or shop floor so it comes with small, hard wheels. Those factory wheels were not up to the job of working in my sea can workshop or from the bucket on my tractor. It used to get stuck when I tried to roll it over an electrical cord or even a nail. I took off the factory wheels and replaced them with large, pneumatic wheels. Now I can push it over 2x4s if I need to and it is much easier to roll out over the threshold of the door and into the bucket of my tractor.


YouTube Video Full System Tour of my Machine Room

This is a video that I made this spring to explain what's in my machine room and what it does as well as the supporting development and operations hardware in my office.


Like most of the things I build this was put together from parts I bought on Ebay, at Lowe's and my local Home Hardware. It used 100 GPD membranes and a small booster pump. It chugged away but we quickly outgrew it.


I built this releaser from PVC pipe that I bought at Lowe's in Ogdensburg, NY, check valves and solenoids that I bought on Ebay, and fence T-bars that I bought at TSC. The controller was an Arduino Nano in the grey box on the side of the releaser. This one was vertical and sat on top of the IBC draining into the port on the top. It worked quite well and didn't cost a lot to build. I can't remember how much it released per dump but it was under 4 L.

view more: ‹ prev next ›