1
Recently assembled my first split keyboard - keycaps are from Yuzu Keycaps, and the case is 3D printed in wood PLA and then sanded, stained, and varnished.
PCB ordered from https://fingerpunch.xyz/

Ergonomic, split and other weird keyboards
Posts must be of/about keyboards that have a clear delineation between the left and right halves of the keyboard, column stagger, or both. This includes one-handed (one half doesn't exist, what clearer delineation is that!?)
i.e. no regular non-split¹ row-stagger and no non-split¹ ortholinear²
¹ split meaning a separation of the halves, whether fixed in place or entirely separate, both are fine.
² ortholinear meaning keys layed out in a grid
No excessive posting/"shilling" for commercial purposes. Vendors are permitted to promote their products/services but keep it to a minimum and use the [vendor] flair. Posts that appear to be marketing without being transparent about it will be removed.
This subreddit is not a marketplace, please post on r/mechmarket or other relevant marketplace.
Recently assembled my first split keyboard - keycaps are from Yuzu Keycaps, and the case is 3D printed in wood PLA and then sanded, stained, and varnished.
PCB ordered from https://fingerpunch.xyz/
Just wanted to share a render for a keyboard I'm making. It's coming end of this year. I didn't show it in the pictures, but it would have legends on the keycaps. I've used dactyls and dactyl-likes before and I've always wanted one that feels solid with high quality injection molded cases instead of the 3D printed ones.
Join the waitlist here: https://taiko.taikohub.com/
Our discord is here: https://discord.gg/ByZyyZDb
Materials: Injection molded ASA plastic.
Target price: ~$350.
Wired/Wireless: The product would come wired. Wireless module to come afterwards.
Hotswappable

My daily driver setup. Using clamps like this allows me to mount to the chair without having to drill into it (or any other permanent modification like that). My biggest complaint about this setup is the USB cable reaching from the chair to the computer. I always need to be aware of where the cable is when rotating the chair and whatnot.


Modifications:
T, S, and R keys to left click, middle click, and right click (respectively). I do not use the buttons on the Kensington at all; I just make use of its trackball for pointing/scrolling, then click with the KinesisI tend to have a very pointer-heavy workflow, so it is important to me to have an efficient pointing solution. Because of that, I do prefer my Svalboard with its integrated trackballs situated just millimeters away. But this is a sufficient secondary setup that has the bonus of being wireless.

cross-posted from: https://lemmy.world/post/37481146
I'm making a custom keyboard with a Raspberry Pi Pico as the MCU, and i don't understand what all the different pins are for and how they should be wired up to my key matrix and trackpoint.
My current understanding is that GPIO are normal pins that can be wired to the rows and columns, but what of VBUS, VSYS, 3V3, and all the others that aren't just GPIO or GND? And how should the ground pins be used here?

The schematic currently doesn't include the trackpoint because i'm planning to hand wire it and the MCU to the PCB, so i can put them under the PCB in the case and i don't have to try to fit them onto the board. Is there a better way to connect these that won't require adding a bunch of space to the board to fit the MCU?

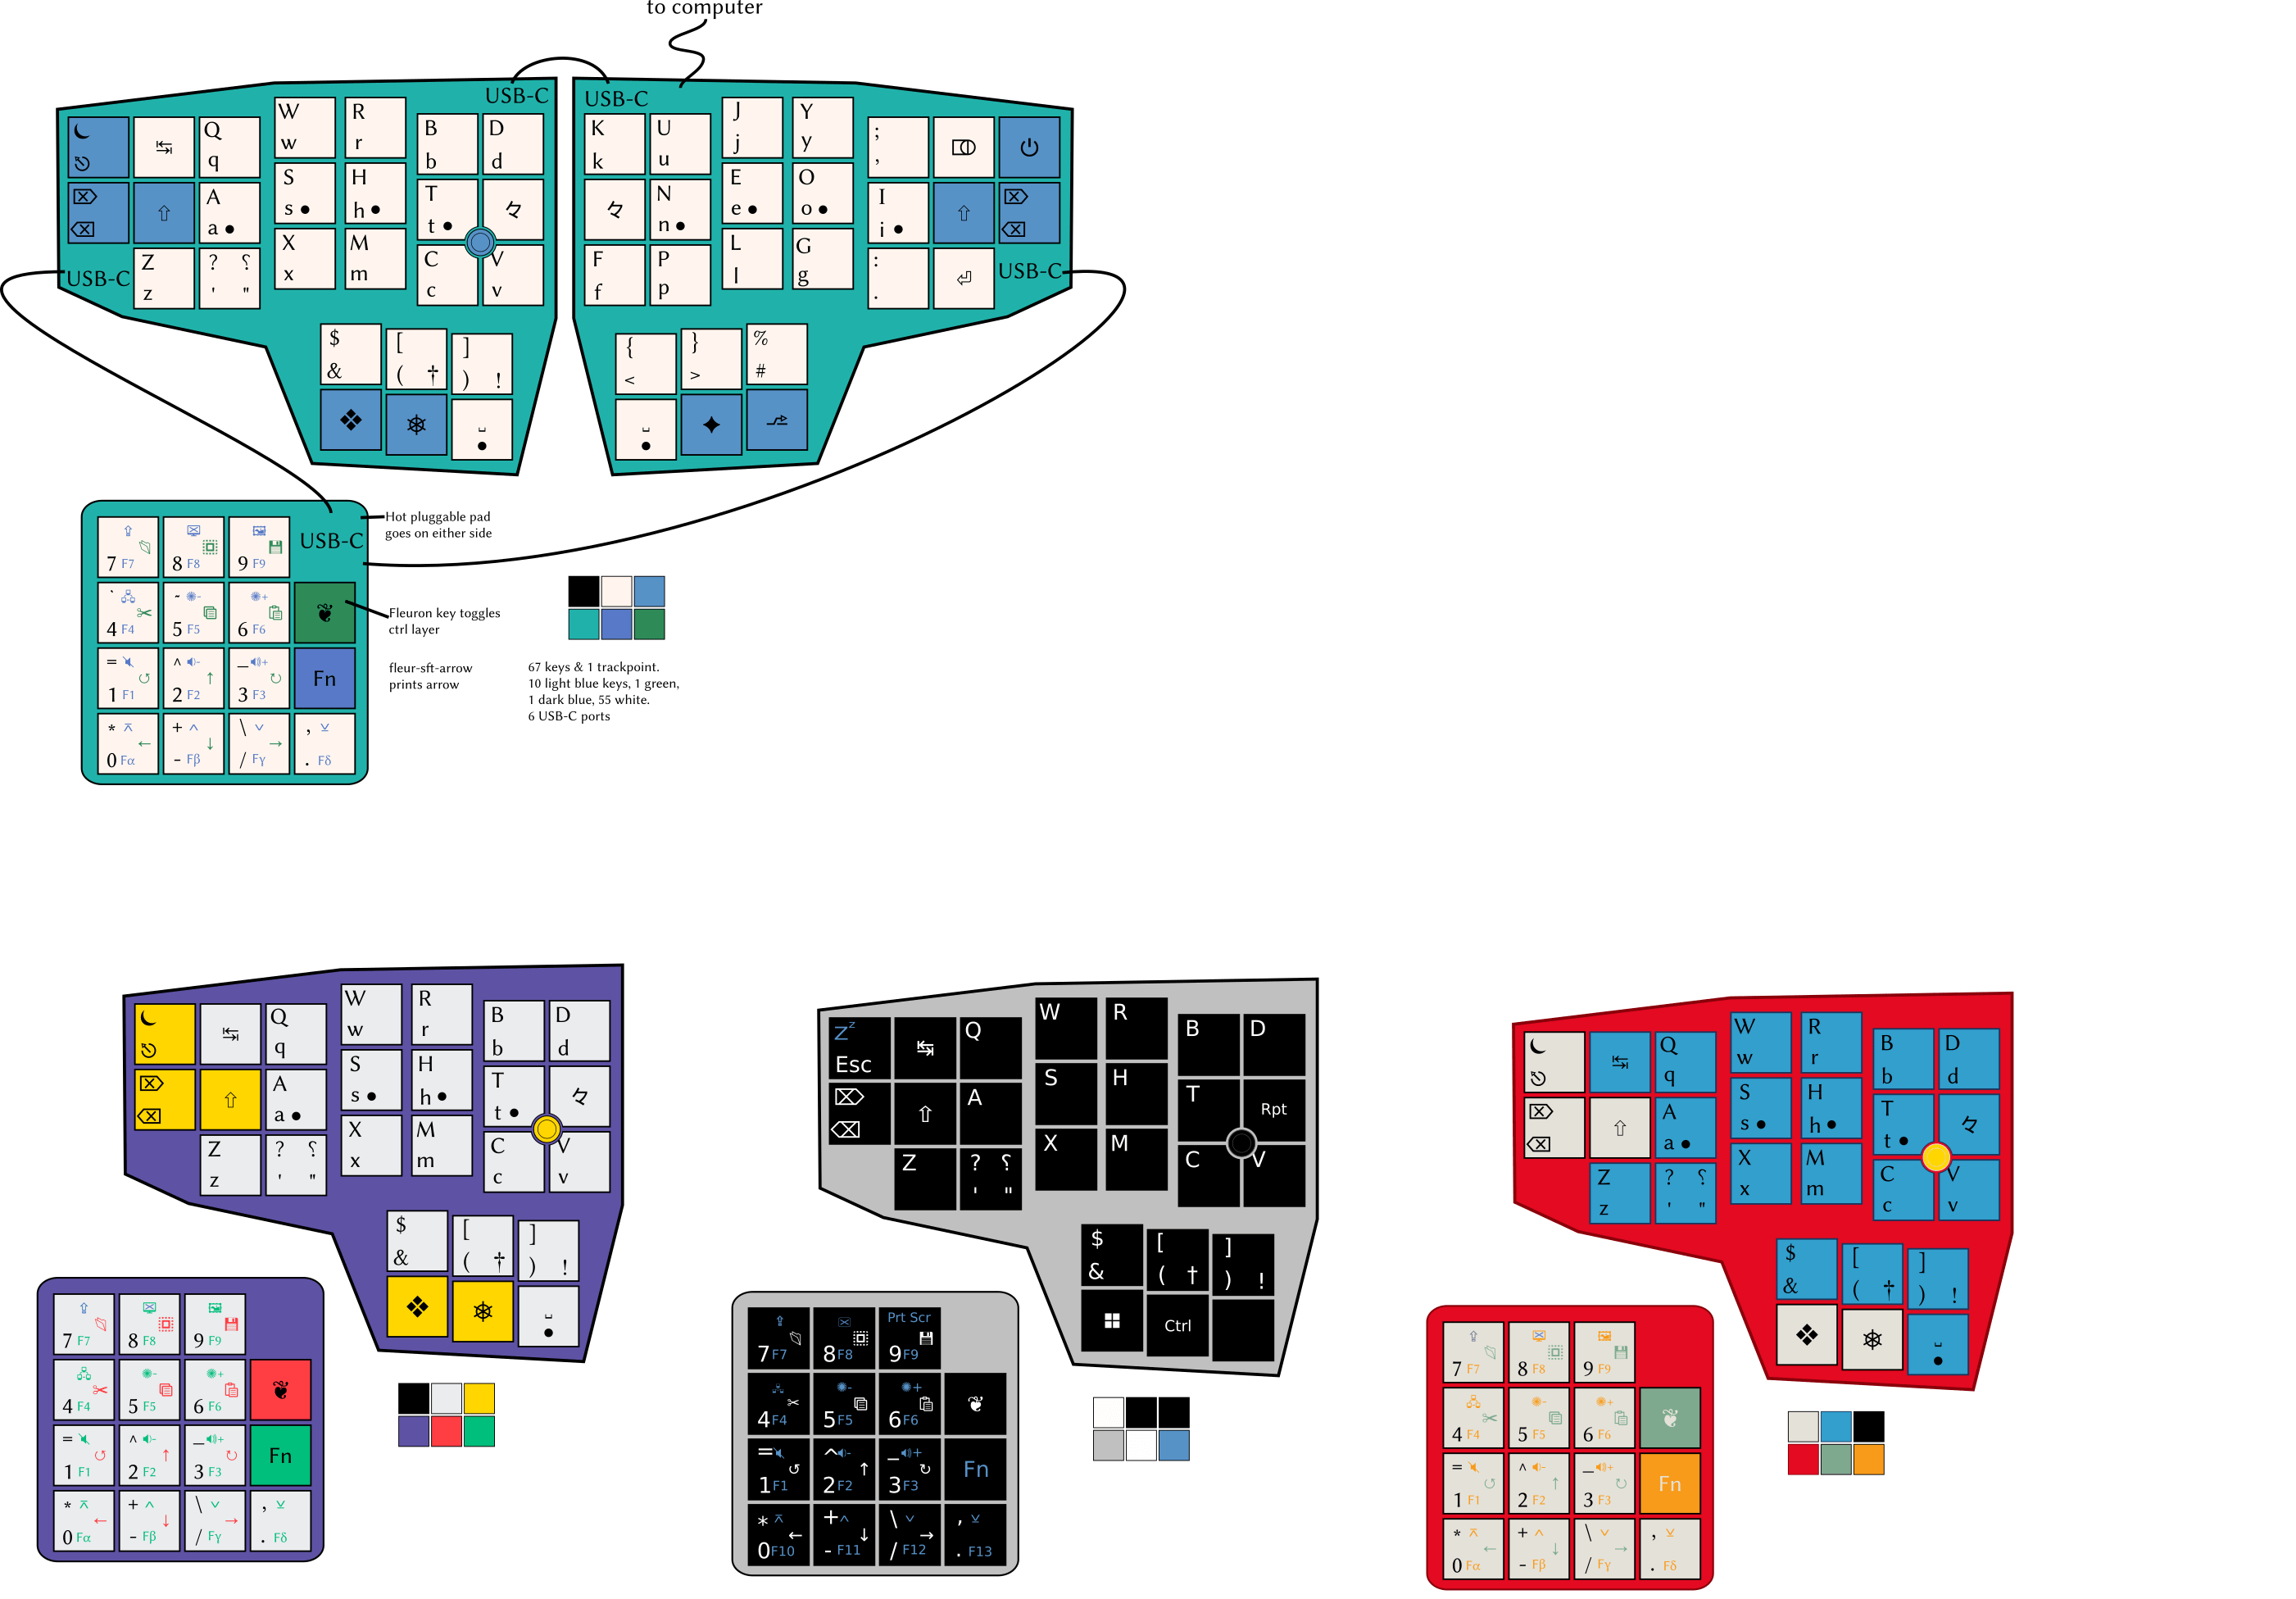
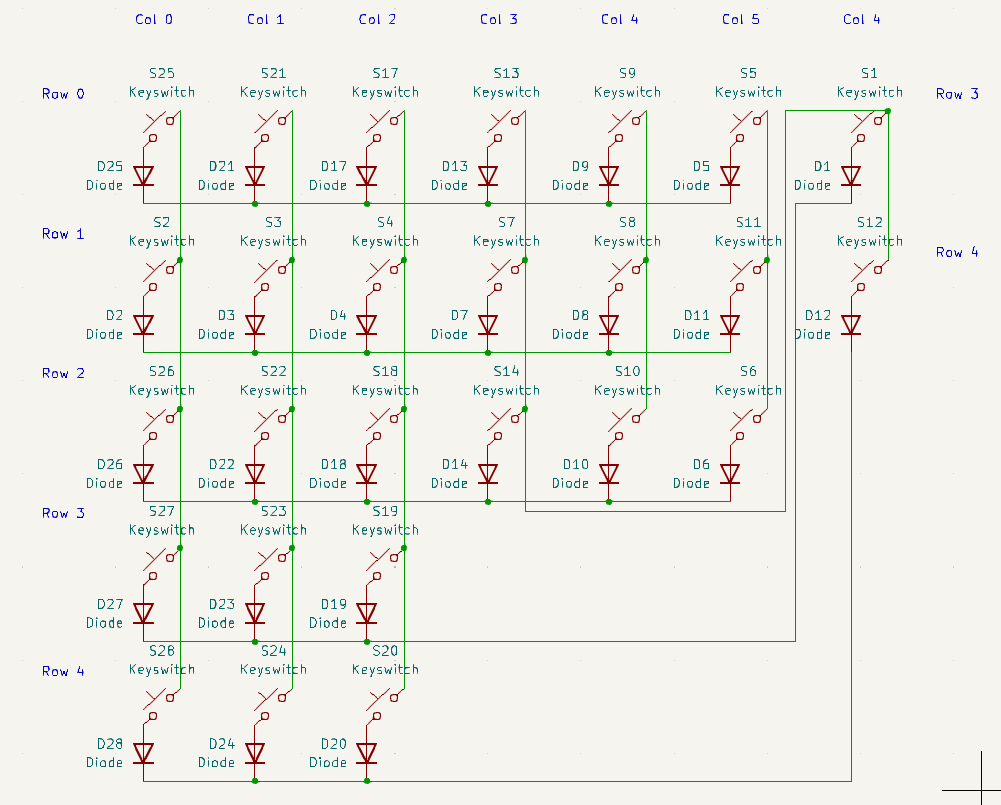
Here's what the layout should look like when it's done, and what the schematic for the right half looks like now. I've seen Joe Scotto's tutorial on the subject.
I'm currently making a schematic for this keyboard in KiCad v7.0. The schematic has the power & backspace keys moved down near the thumb keys to use one fewer pin on the controller, hence the slightly messy wiring.
Thanks in advance.
I have made myself a wireless, 30-key keyboard, and have decided to make things more complicated by learning a new layout as well. This was my first time ordering PCBs and sourcing components locally, so am feeling a bit chuffed. I had to bolt everything down to a board, as the case snaps around the PCB, and was tight enough to start bowing the sides up, but this fix works and I'm happy with the aesthetic.
Check out my modified Hands Down Vibranium-f layout.

My current project is a "Writer Deck," a low-powered computer that boots directly to a text editor or word processor (RPi Zero booting to Wordgrinder, btw). Being the weirdo that I am, I also want to use this as an opportunity to try a split layout again, and see if I can get myself used to something other than the "Advanced Hunt and Peck" that I do now and that tops out at 60 or maaaaybe 70 wpm. The deasign I've come up with is a split monoblock based heavily on a Corne, but with a very modest split angle and the thumb cluster (1) shoved a bit farther under the hands and (2) built around 1.25u keys because they can be adapted to switch-stabilized 2.25u or 2.75u (see the green outlines). The whole thing fits in the Pok3r/GH60 footprint.
So, ergo-mech people, is this a completely silly layout? I have always felt that "literally never moving your hands" isn't necessarily as ergonomic for the average typist as has been promoted, and I do like a good nav cluster, but I also wonder if I've compromised too much to hit that footprint, especially with moving the thumb cluster away from the center. The intended use case will be much more prose (journaling and other creative writing) than code, so I'm less concerned about optimizing for programming. I've never had major RSI issues myself, just needing to switch from a mouse to a trackball for a little bit every year or two.

Alt text: POV you are sitting on a sofa, left half of a split ergomech keyboard resting against the left leg under an angle (tented) while a black cat provides wrist support

Ever since my 1st kit (a Beekeeb Hillside 46 splay) I have been wishing I had gone wireless, for better portability. I also progressed to the point where I wanted fewer keys, and a single board, but still wanted some decent splay. Thanks to keeb supply for stocking Ryan Schenk's Re-gret! It's a lovely compact keyboard, and meets my needs almost perfectly! And...it fits well in a Nintendo Switch case. ZMK was pretty quick to get working as well, though the error message after flashing each time had me worried for a bit. I did have to get a small rubber foot under the translucent cover plate to hold down the controller, as it tended to lift when charging via USB, breaking the touch connection to the battery, but I've got that dealt with now and everything's good.

Pictured: current TKL below, split ergomech above
So I recently got my first ergomech keyboard: a used BastardKB TBKMini, 3x6+3 layout.
It came with the default keymap.
I have been crafting my own initial keymap, using some vim-based heuristics and Callum style one-shot mods.
Followed BastardKB's instructions and got my keymap to compile.
Then onto flashing. This is where the problem is.
Instructions: https://docs.bastardkb.com/fw/flashing.html
I managed to put the device into bootloader mode with both layer keys and the top-left key. Verified that it is in bootloader mode by checking that typing has no effect. Also lsusb shows "Atmega32u4 bootloader" instead of "BastardKB TBKMini keyboard".
But I don't get a disk device.
I tried adding the udev rules that QMK docs recommend: https://docs.qmk.fm/faq_build#can-t-program-on-linux
But it still won't work.
I even tried another pc with other OSes: same behavior on
Any ideas on what is going wrong here or what I could try to work around this? I really want to start using my split ergomech with a proper keymap.
Looking forward to reading your suggestions tomorrow morning (in about 9 hours for me, I'm in Europe). I wanted to post this now because I hope the Americans will be able to help me.
EDIT: Thanks, with your help and the help of some kind volunteers on the bastardkb discord I figured out that I have the old v1 elitec version and I managed to flash it with an old version of the bastardkb firmware. I got the layers working, as well as the combo, but callum’s oneshot modifiers aren’t working yet: https://github.com/fhoekstra/bastardkb-qmk/tree/main/keyboards/bastardkb/tbkmini/keymaps/fhoekstra
EDIT2: I finally listened and just followed the upstream QMK instructions, and it all just works, with Callum-style modifiers, combos, and a custom caps word:

Hi there fellow people,
I was building an Aurora Sofle_v2 and I may have screwed things up. I melted one of the RGBs with the soldering iron and in the process of trying to remove it the solder pad was removed as well
After that I tried to "fix" it a handful of times, and now I believe that the connectors might be gone =(
Is there a way for me to salvage this RGB? (Or perhaps to link the previous one with the following one on the chain, so at least it works for the others)
I was thinking of connecting things using cables, is this an option?
Update: Bodge wiring worked! I got some spare cable pieces I had laying around and soldered it to the board The back doesn't look pretty, but at least it's lighting up (except the last RGB where I accidentally soldered two pins together, after this I'm not going through the troubles to fix it)


Something like this? The heavy stagger is great, 42 keys is almost perfect, but the thumb placement is -- for me -- horrible. Having to move my thumb to practically under my palm is just terrible ergonomics.
This thumb layout reminds me more of the ErgoDox variants, and is far better placement. Is there a layout close to this?


Hello everybody!
I have finally made a new version of my mechapress88 (see my previous post here https://www.reddit.com/r/ErgoMechKeyboards/comments/1fs4ui9/we_need_more_flat_keyboards_meet_the_mechapress88/ ). This is the V3! I only assembled one half of the V2 and given up because it was too hard to assemble, so no post for that.
This keyboard uses the new Kailh PG1316S with actuation force of 35gf, as opposed to the Cherry ULP switches of the V1. To my knowledge, this is the first design to integrate RGB leds. Not that I find them useful, but it was more for the challenge :P Also, it features a speaker!
Now let's talk about the build.
As said before, the switches are the new Kailh PG1316S. The V1 had Cherry ULP switches which are of similar design. The mechapress v2 had all components on a single side, including the switches, the RGB leds and the diodes. This design only has the RGB leds under the switches, and the diodes on the underside.
I found that the Kailh switches are of poorer quality than the Cherry ULP. The main issue I have with them (which I discovered only after assembling the first half of the v2, and one half of the v3) is that around 10% of them do not lay flat on the board surface. Since I solder with a reflow oven, I place all the switches on the board and bake it. So it's only after taking the board out that I notice that 3-4 switches that are half soldered. This is an issue I didn't have with the v1 and the Cherry ULP, despite that being the first time I did such a job.

For the last half that I soldered, I only took good switches that lay flat on the board, and they all worked on first try.
I didn't like the official keycaps, I wanted more opaque ones to diffuse the RGB light a bit, and a more concave design to better feel how fingers are placed on the keys (and I wanted a home row bump). I designed my own keycaps, https://cad.onshape.com/documents/a1e8f687f2876977978d0499/w/2031da5aa86fb49b49b9da68/e/8571dbe03717cd2187e32d4a (based on madbadmax's design from https://www.reddit.com/r/ErgoMechKeyboards/comments/zpo9h6/comment/j0ttss7/ ).
My keycaps are 3d-printed vertically with a single support, on a Voron Trident with a Revo 0.15mm nozzle.
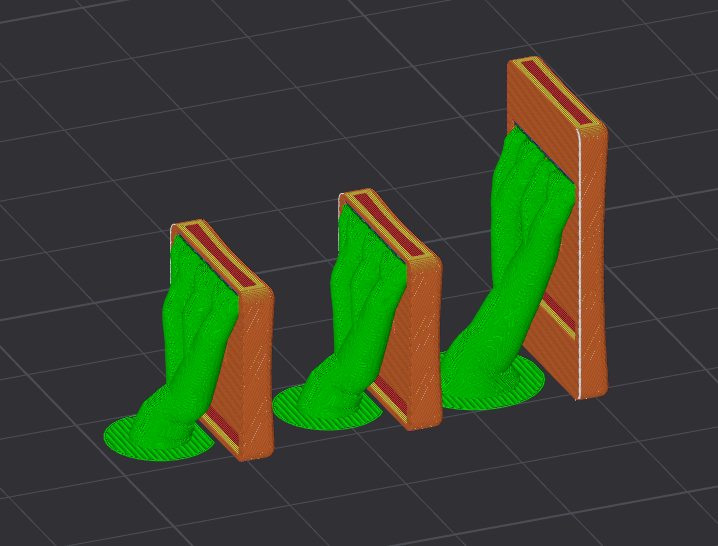
After nailing down the tolerances, I managed to make something that works, but the feel of key presses is not great. If I want proper keycaps, I'll need to figure out how to access a resin 3d printer.
The Kailh switches are VERY fragile. Removing keycaps from them can easily damage them. For the last half, to remove the keycaps without damage, I baked it in my reflow oven. A few minutes at 80°C (which the maximum storage temperature indicated on the datasheet of the switches), then I took them out with tweezers. The board would cool down, so I had to bake it a few times.
As other people have said it, soldering these switches is hard. Even more so when you have components under the switches. My mechapress v2 design had SOD-923 diodes, they are next to impossible to solder. They are tiny, The pads are tiny, the solder paste doesn't stick on such tiny pads, the diode doesn't either, I had to rework a lot of them.
For the v3, I switched to SOD-523 diodes, and put them underside so that I can fix them without removing the switch if need be. These diodes are almost impossible to solder. Even if they are bigger, they are still very small. Also putting components under the board makes reworking very hard. My solder plate was not in contact with the board, but with the diodes, so heat wouldn't propagate well through the board.

These are the v3's SOD-523 diodes.
So, for the v3, I used a reflow oven (the great Controleo v3), with SAC305 solder for the diodes, then reflowed a second time with low temp solder paste Sn42/Bi57/Ag1 for the top side. The use of low temp solder paste made reworking the board easier (especially for those bent switches!). Heating the hotplate to 200°C is enough melt the solder, though on the v3 with the diodes under, I had to heat it up to 220°C. I'm sure this helped not damage the diodes. Nevertheless, reworking the boards with a hot plate bends them. My right board isn't flat anymore.
Btw, stenciling was done with a personal fork of this jig https://github.com/scheffield/stencil-fix connected to a Dyson vacuum cleaner. Reworking was done with a MHP30 hot plate and a Pinecil solder iron.
I used a Pixel Pump ( https://shop.robins-tools.com/ ) to place the SMD components. It helped, but it's not miraculous. Placing SOD-923 or even SOD-523 diodes with it is still very hard. A few of them went flying and I didn't find them to this day.
Disclaimer: I have no electronics formation. I suck at this, and it may explain why I had such a hard time. Maybe I did things wrong too. I'm open to recommendations!
The case is 3d printed. I finished designing it yesterday, to print today. Then, before going to bed, I saw the mikecinq post by @dynam1keNL ( https://www.reddit.com/r/ErgoMechKeyboards/comments/1kjbfr5/mikecinq_my_second_pg1316s_keyboard_incl_long/ ), and thought about slanting the top surface of my design too so that it doesn't get in the way of the thumb keys, and here it is!
The case is designed with build123d, a CAD tool that allows designing parts in Python (I guess that's nerd).
The same pro-micro clone from aliexpress that I used for the v1. Still running the qmk firmware.
This keyboard is still a prototype, features I plan to add:
I hope you like this board!
I want to thank everyone who post their builds. They're a great inspiration, and I learned a lot from them. Please keep posting your custom builds. And to people who haven't attempted a build yet, please do it, the journey is long, but it is great :D
Photos are not of top quality, but neither is the keyboard, so I guess it's fine :D

cross-posted from: https://feddit.org/post/11676258
The Nocturnal Ambient switches are insanely quiet. I am typing at normal speed now that I moved the keys up one row so that it matches my Planck. A much more familiar layout, a much softer approach to typing, I still miss the tactile bump feedback, which is what makes typing satisfying, but this has been an incredible experience so far. So smooth, so soft, and just so sleek and ergonomic.
Now that I've completed my article for work, I find myself trying to find things to type and write about. It just feels so good to write this way.

I've been looking for a long time for a solution to not having a desk, or room for one. This tiny bedside table barely fits anything... I was using a regular mouse on the bed and dangling a regular keyboard half off the table, which didn't work so great as you can imagine lol. Now I've got this Ploopy Adept trackball and a FalbaTech Atreus62_FT keyboard. Switched to Colemak-dh layout just to make the transition as jarring as possible 😝


