3DPrinting

20339 readers
38 users here now

3DPrinting is a place where makers of all skill levels and walks of life can learn about and discuss 3D printing and development of 3D printed parts and devices.

The r/functionalprint community is now located at: or !functionalprint@fedia.io

There are CAD communities available at: !cad@lemmy.world or !freecad@lemmy.ml

Rules

If you need an easy way to host pictures, https://catbox.moe/ may be an option. Be ethical about what you post and donate if you are able or use this a lot. It is just an individual hosting content, not a company. The image embedding syntax for Lemmy is ![](URL)

Moderation policy: Light, mostly invisible

founded 2 years ago
MODERATORS
1


I've had a Qidi Q1 Pro for a while now and I really do love it, very minor issues (mostly caused by my tinkering) so far and now I need help from someone that's a lot smarter than me.

There's a gesture to auto replace the filament. Problem is, it just does that wherever the head is and makes a mess on the plate. So I had an idea, why not move the head back to the chute and do the filament change there? I added the code for that (including a few wipes on the pad) inside the filament change macros but had to add a home all axies G28 first in order to locate the head and then move it.

That presents 2 problems: 1. When you push go on the screen to change the filament, it heats the nozzle first and then calls the macros. Doing that oozes filament out where it is, still making a mess. 2. I'm trying to experiment with manually changing colors during a print but it calls on that same automatic filament change routine with the homing call which makes it lose its position.

If anyone knows how to change the screen's firmware and/or knows how to fetch a current position and feed it to the macro (I would add an if statement saying if the location of the head is unknown, home, otherwise proceed) I would be very excited to hear from you!

2


I've never found an elegant solution to add weight to prints. What are your favorite ways? What's the best cost/weight ratio? Weight to space? Cost/weight/space balance?

3


I made this Linux Mint logo emblem to cover up the Apple logo on my old MacBook that now runs Linux. I am not sure if it will cover the logo of all MacBooks but i am sure that it can be scaled to needs.

I used Prusa Slicer, to slice it, and it automatically offered the option of a color change. I used a translucent red for the lower part and a dark grey for the top. You may want to experiment a bit with the types and infills to get the appropriate effect. I used very fine layer hight as well as ironing to get a smoother surface.

Then simply glued it on top of the illuminated logo

Available for free on Thingiverse and Printables

PS: Many failed attempts went into take this fairly bad picture - i apologize but the dogs were too comfortable

4


I am sorry for all the people having problems, but my Prusa mjni is finally just workjng and happily printing all the stuff I throw at it. Its been having issues here and there forever. I just figured out that the hotend has not been assembled correctly (heatbreaker to nozzle seal was weak) which became a greater issue when switching to a 0.25mm nozzle. Now after I fixed it, it is just awesome :)

5


Really interesting experiment

6
7
submitted 1 week ago* (last edited 1 week ago) by Strayce@lemmy.sdf.org to c/3dprinting@lemmy.world


So a few months back I found an EasyThreeD K7 in the ewaste bin at my work. Probably where it belongs tbh but I figured hey.. free printer. It works okay, sometimes. Usually okay for small and simple stuff, but tends to fail on anything serious. In the process, I've found my way around openSCAD, Cura, learned what can go wrong, how to troubleshoot, etc. It's been fun and educational. So, not a total loss, especially for $0 upfront. I'd feel cheated if I'd actually paid for it tho.

OTOH, I've wasted enough time, energy and filament on failed prints that its time to upgrade. I'd like to avoid Prusa and Bambu for personal reasons that I don't really want to go into on this comm. This is only ever really going to be a hobby for me, I see it being useful for fixing little stuff around the house like broken buttons and catches, building small ornaments or containers for things, and the occasional functional project like stands and mounts for devices or the odd project enclosure.

I've also used the Ultimaker 2+ at my local library. Although, Ultimaker seem to be focused on industrial applications these days; probably overkill for my purposes.

Prefer magnetic / flexible build plate, but glass isn't a deal breaker so long as its heated. I'm fine with manual leveling and offset so long as it's marginally more automated than the K7. I'm also alright with tinkering, replacing parts and firmware upgrades. I'd prefer a good community and aftermarket rather than having to rely on manufacturer support.

Based on my research, I'm leaning towards an Ender 3, although I'm not entirely sure what the difference is between models because the naming scheme is confusing. It seems to be a more open platform, and the community support and aftermarket seem great. But before I go ahead, are there any other brands/models I may not have heard of that I should be considering?

7


There's a few 3D printable corner cut jigs out there. I designed my own for three main reasons:

  1. There's a little ruler on the side to mark the width of the fold-over section of the cloth
  2. It's parametric (using OpenSCAD), so you can customize various sizes (spacing from corner, various thicknesses, size of ruler, etc.)
  3. I like to model stuff myself because it's fun.

https://makerworld.com/en/models/2000894-corner-cut-jig-with-ruler-for-bookbinding#profileId-2154412

8


I'm looking to get a halfway decent general purpose scanner, and the market is all over the place. I don't need anything with industrial engineering precision, but I would like to be able to scan broken parts around the house to print replacements with at least decent precision.

I expect most of my use cases would be in the 1cm³-1dm³ range, but it would also be fun to be able to scan bigger subjects. Mostly people, so I can make personalized tabletop minis, but I also like the prospect of miniaturizing other things.

Blue laser looks super cool, but also very pricey.

What are the best options in the $500-1000 range? I'm kinda outta my depth here.

9


Hey all I planned on running overture pla in my new ams 2 pro because money.

So far I have some pla rings for the outer edge of the cardboard spools.

Wondering should I run an anti snag cutter on it???

What about weights in the spools?

And is it possible to have the Bambu monitor the useage of the spools?

Tia

10
10
submitted 1 week ago* (last edited 1 week ago) by idunnololz@lemmy.world to c/3dprinting@lemmy.world


Only started 3d printing recently so I don't really have any thing to compare against so I'm asking the community. How bad are these VFAs? Should I just leave as is or is this bad enough to try to troubleshoot?

I'm currently only doing functional prints so this is only a minor, cosmetic issue for now. However in the future that might change, so I wanted to check if this is mostly to be expected or if there is something very wrong.

3D printer is Core One running 6.4.0-RC firmware.
Filament is generic black PETG.

11


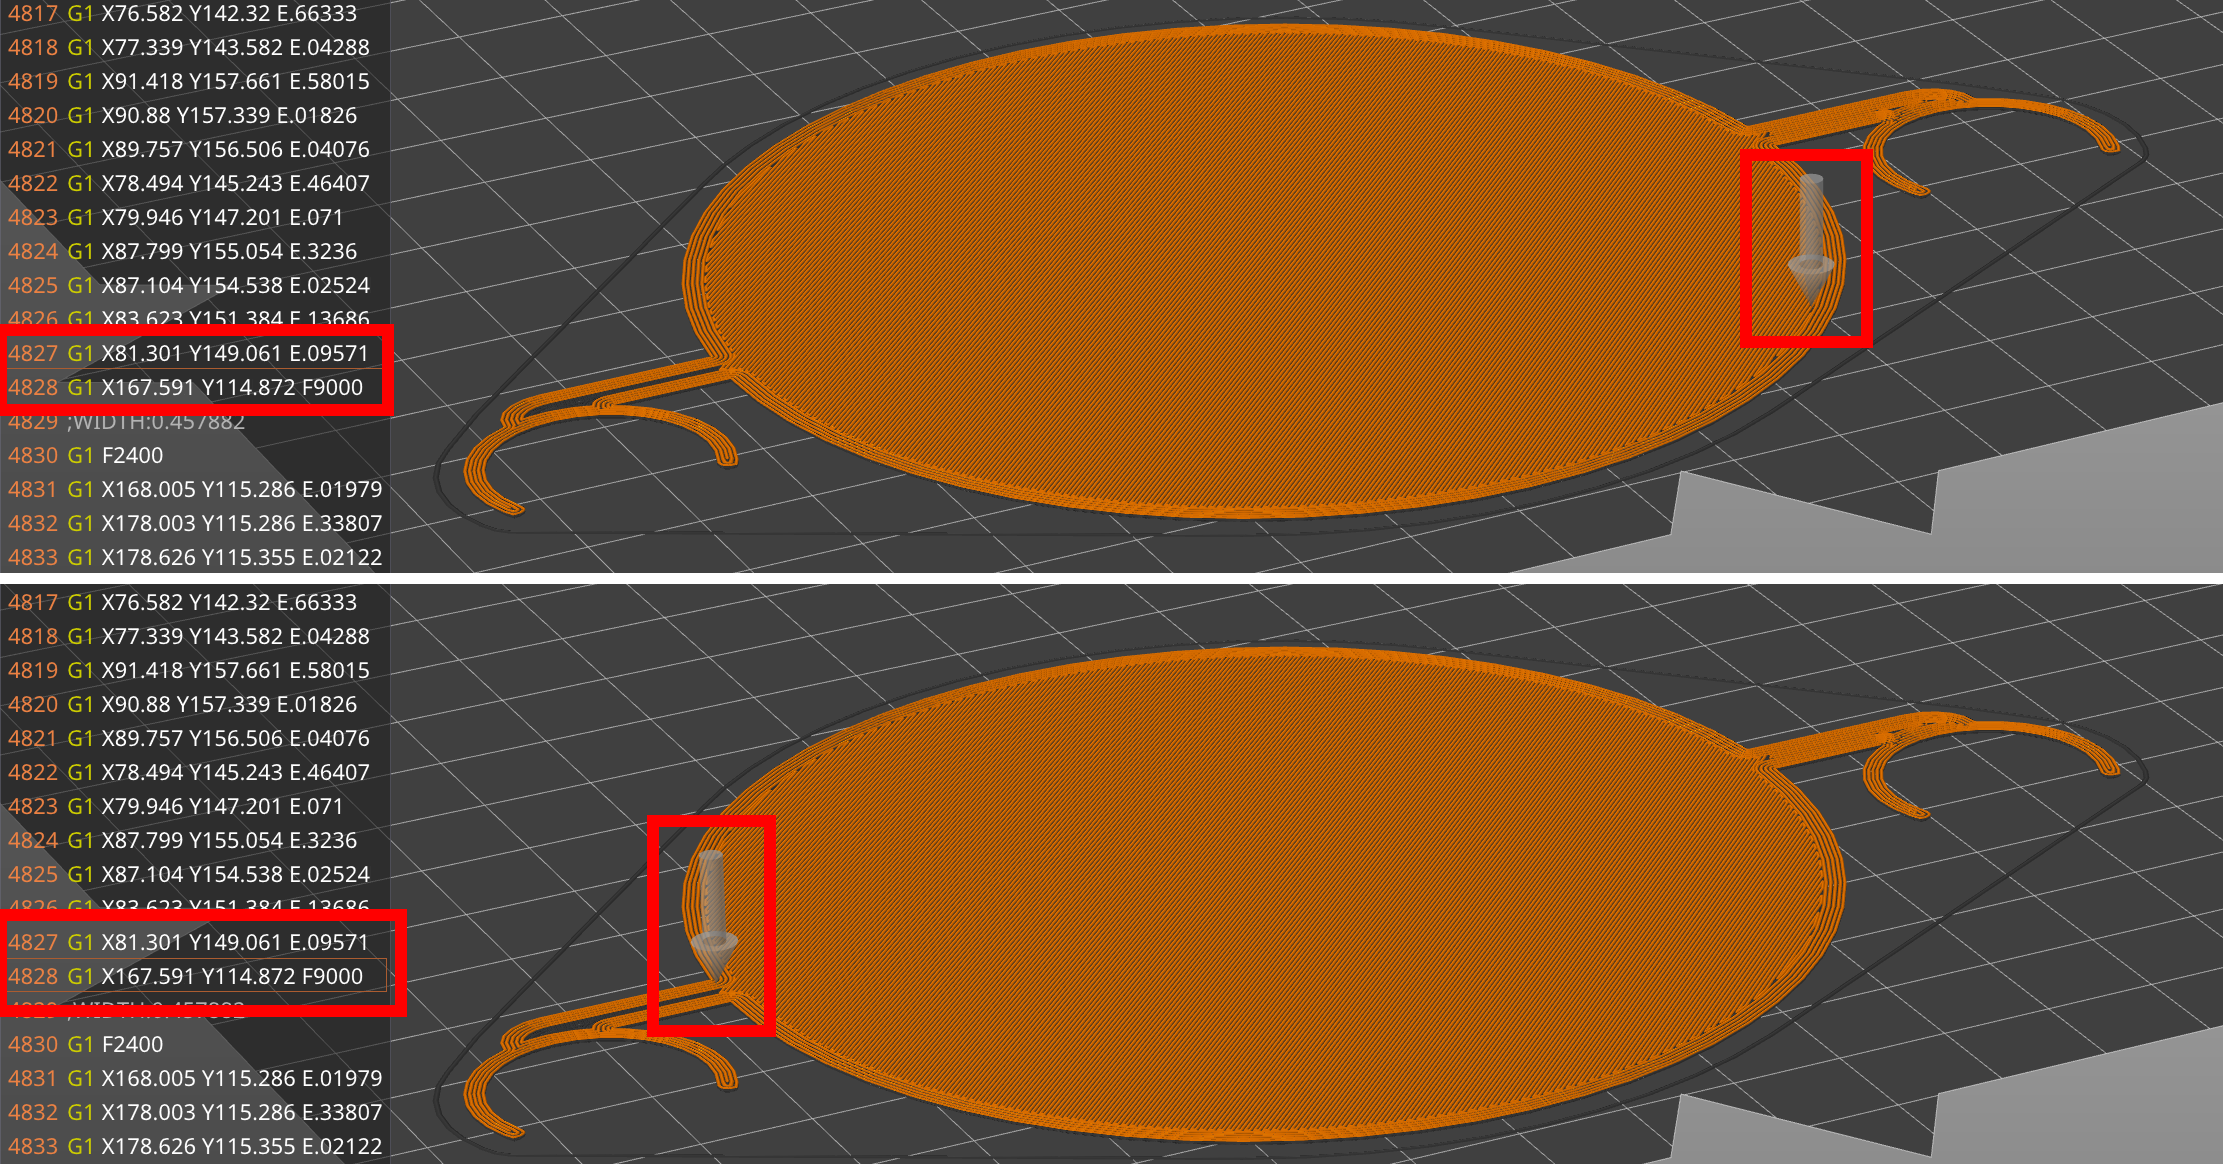
Hi, I've been printing for about a year, sometimes even successfully, but on this specific print, the nozzle drags through the layer for no reason. Usually, a Z-Hop prevents that, but on this very print, the Slicer somehow doesn't add one. I'm using Orca Slicer (dockerized, Linuxserver.io image from last month, 15.09.25) and have enabled Z-Hop in the printhead config (all surfaces). It does add Z-Hops on other moves, just not here. And yes, I know my Z-Offset is a tinge too low, which is part of the problem, but I'd like to focus on Orca Slicer not Z-Hopping first.

Does anyone know about this issue? Slicing with PrusaSlicer works; I can just switch back to that one if I don't find any features I miss from Orca Slicer.

12


Ordered a complete system from Bambu with an ams pro 2. So everything minus that 4 pin cable came in within 2 days, pretty impressive honestly.

That 4 pin cable is somewhere in Cali stuck in transit. Was wondering if anyone had any luck with something on Amazon? Idk if the cables are straight shots or they cross over.

Worst case I’ll just wait it out.

13


The firmware is released and Open Centuari Project is chugging along. There will be no AMS and you'll need a carbon 2 for that . . . what are people's thoughts and feelings? Personally, I still really like the printer and multicolor has never been on my radar. I recently updated to the latest firmware and can turn the light off and on while printing and have been enjoying that. I am interested in the community efforts and when the company upsets me enough, I may go whole hog into that but for now, I'm just making stuff and having fun. Where is everyone else at?

Cross-Post link to community specific area

14


Maybe somebody here can point me in the right direction, I recently installed KAMP on my creality K1C using the creality helper script.

The P part is working great, purge line moves around as expected, but if I start the print from orca slicer "upload and print" It doesn't seem to build a mesh at all, just touched the center of the plate and starts, if I start the print from the touchscreen it touches the corners, no matter how small the actual print is.

I activated label objects and exclude objects in orca, I even added the M117 command mentioned on the github. Anybody got any idea what I'm missing? The helper script wiki says it should be plug and play

15


Not sure if anyone has seen this before but I bought two spools of PETG from Elegoo, one in white and one in black. Their regular PETG, not the rapid one.

Yesterday I printed with the white spool and it worked pretty well.

Today I tried to print with the black spool and the filament would not come out of the nozzle. I tried diagnosing the problem and ended up swapping nozzles, taking apart the nextruder and putting it back together. Then I tried printing again and again the filament would not come out. I swapped back to the white filament because at this point I've essentially ruled everything out except the filament and the white filament worked. I then tried the black again and it would not print. I cut off about 10cm of the filament and tried again and same issue. Finally I cut off about another 50cm and now it started to print.

I'm not sure if this has happened to anyone else or if anyone knows what the issue is. It's almost as if the filament refused to melt or had an much higher melting point vs the rest of the spool.

16


I woke up to this idea for some reason. I come from having owned an auto body shop twice and doing custom graphics and airbrush work for a decade. One of the biggest expenses in auto body work is abrasive sandpaper. Few people ever take prints to anywhere near the finish quality of automotive paint, but that is another thing entirely.

In optics, metrology, and machine tools, often reference flats are made by rubbing two objects together by various means of lubrication.

Likewise with auto body refinishing, I am always thinking in terms of sanding blocks. Sanding blocks are either bought or custom made. Commercial blocks are usually foam or rubber of various hardnesses. Sandpaper is attached or just wrapped around the sanding block by hand. The purpose of the block is to only sand the high spots without touching the low spots, kinda like a bridge. The flexibility of the block allows it to conform to the broader curves of panels, but its overall length determines the size of depression it will bridge.

This is super important for auto body work where the clear coat reflections will be plainly visible in the end, and depending on the color, will show several types of errors that other categories of finished objects are never subjected to by critique.

So, if you follow thus far, let's go one level further. The next level of block sanding involves reproducing positive contours that a block cannot bridge. Most jobs can be sculpted freehand, but sometimes this just doesn't suffice and it still looks wonky. The way to fix this is by making a custom shaped sanding block. Often balsa wood is a good choice for making a custom block by cutting thin boards in a stack of contoured profiles. At least this is how I did it back before 3d printing was a hobby accessible thing, and if I couldn't use another method. The most common method I used was simply a collection of oddly shaped and contoured objects I kept around for the purpose of sanding.

The purpose of my bla bla bla is to contextualize this overall post idea and abstraction. This is a very advanced and niche concept involving high quality finishes. So let's combine the ideas.

  1. Like polishes like, or precision abrasion is possible with similar objects and abrasives like with optics.
  2. Sanding is about bridging to abrade the highs without touching the lows, and following contours.
  3. If fiber infused filament is much more abrasive than regular filament, it has potential to abrade a part as a tool.

So my idea here is that there are many potential small run applications where a sanding form could be printed that will shape or finish the final print. There are many possible techniques I can think of for this type of application.

If you have messed with sanding ABS, you may realize it has a somewhat unique texture and feel. It is the primary plastic used in automotive bumper covers and trim parts. The reason why it is used is because ABS has very similar thermal expansion and adhesion properties that make it compatible with automotive paint refinishing systems. It would be my choice for the best plastic to use for this idea of a fiber infused print as a sanding abrasive.

With any type of sanding, special care is required to ensure finer sharp details are retained. Like on an automotive panel, I often turned any sharp transition like a crease or corner into a sharp edge throughout the filler and primer phases. I only shaped these contours at the end, just before the final primer sealer.

With a print, let's say something like a chess piece, I should be able to print a 2 part shell out of a fiber infused ABS. This should have a small gap that surrounds the final print. Then print an abrasive version of the final product. If these are fastened to something like the sanding surface of a dual action power sander, the two like forms should smooth any layer lines without requiring effort from me. Then once the final part is printed without any fibers infused, is placed inside the shell and the DA sander is run, the extra abrasiveness of the shell should last for a small production run. Adding water into the process like wet sanding would likely speed up the process and make the abrasive shell last longer.

Overall, the complex formed abrasive might enable an unique form of manufacturing process. The potential for automation greatly reduces labor costs in time. Even just as a basic abrasive material, it may be cheaper to print something than it is to use sandpaper in some applications. I have no idea how effective it will be overall. If mostly automated, the time does not matter.

17


~~the listing~~

I don't know enough to know what I don't know, but the price seems pretty low even for a used 3d printer. Do the pictures or description give any indications?

edit: Thanks to everyone for the replies! I woke up and saw a bunch of messages and was like, "oh crap what did i say this time."

Prevailing opinion seems to be it's probably a fair price, but my lack of experience makes it a risky choice.

18


The Ultimative Filament Drybox

Introduction

So... I saw those filament dryboxes. Of course I'd wanted to design one by myself so badly…

And here it is! Let me introduce an overengineered but cool looking drybox spool stand!

  • Does it print fast? No!
  • Does is has bearings? Damn, yes!
  • Will I need metal saw? Of course yes!
  • Can I insert a hygrometer? I've got you covered!
  • And silica gel? What's about silica gel? Put it into the included container!

Motivation

I designed this quad-roller-spool-baseplate with maximum spool width in mind for a 4L cereal box. The four rollers have small but sufficient shoulders, so any spool smaller 68mm in width can fit.

All parts are designed to fit into 4 liter "Skroam" cereal boxes with three finger grips, you can find these at the big A.

For my Prusa Core One an outlet on the top is perfect. This way I can put the box besides the printer. If I'd like to store a spool for a longer period, I swap the printed cover with the original one, and the box is 100% air tight.

BOM

To build one box you'll need:

Printed parts

  • 1x BasePlate (Filabox-BasePlate.stl)

  • 1x Cover (Filabox-Cover.stl)

  • 1x Silica box (Filabox-Silicabox.stl)

  • 1x Silica box cover (Filabox-SilicaboxCover.stl)

  • 4x Roller (Filabox-Roller.stl) Additional parts to buy

  • 1x 4l cereal container, obvious

  • 1x 4mm PTFE tube of your needed length

  • 4x bearing 685ZZ (5x11x5mm)

  • 2x M5 threaded rod L=62mm max. (61.0mm to 61.8mm will fit best)

  • 1x digital rectangular hygrometer

  • 1x bondtec push-fit pneumatic coupler (PTFE ECAS04)
    Optional parts

  • 2x Roller Tool (Filabox-RollerTool.stl), it's a tiny allen key to mount the rollers easily

  • 1x Cap (Filabox-Cap.stl) to close the PTFE tube

  • 1x PC4-M6 pneumatic coupler for the cap How to print
    I printed my parts with PLA:

  • Base: 2 perimeters, lightening infill, 15%, support for the hygrometer-bridge, 0.25mm layer height

  • Rollers: 3 perimeters, infill 30%, change scarf joint placement, 0.2mm layer height

  • Other parts: 2 perimeters, infill as needed, 0.2mm layer height

  • However, if you'd like to change anything for your needs, go for it.

For your convinience: I've added a 3mf file with all parts for one box and appropriate settings!

Assembly

  • Print all parts
  • Cut 2 pieces of a M5 threaded rod to a length 61-62mm (max.)
  • Insert all 4 bearings as shown in the pictures
  • Screw the threaded rod pieces in one roller each (thread will cut into plastic)
  • Get the rollers with mounted rods into the bearings (gently)
  • Screw the second roller for each axis very carefully until no gap is left
  • Insert hygrometer
  • Finally, fill your silica container and put all together Rollers should turn easily! Don't screw it tight, the bearings are tiny and should not give you any resistance!

Appendix

You may ask... What the heck are the V-slots for? Why is there a notch on the top? Well... You'll might surprise me with your addons for smaller spools or clip-on filament labels :)

19
219
submitted 1 week ago* (last edited 1 week ago) by idunnololz@lemmy.world to c/3dprinting@lemmy.world


Spent all weekend assembling this Core One. It probably took 14 hours in total. 12 hours to build and 2 hours to troubleshoot issues. Broke some parts made some mistakes but I finished the build.

20


I see a Creality Ender 3 V3 (not SE or KE) for $130 refurbished, and also a Creality CR-10 SE for $103 refurbished on ebay. Are either or these a good choice to get into the hobby, or am I making a mistake? Should I rather buy a Bambu? My budget is around $100-$200 max. Please advise.

21


Not looking for support, just wanted to show newcomers that good printers with good calibration also can make spaghetti.

I'm not entirely sure what happened here, as I didn't pay attention, but stuff like this usually happens when a booger of nozzlesnot sticks to the print somewhere and hardens, and next time the unsuspecting print head comes along it hits the (now solidified) snot, and the belts skip a tooth or two.

22
21
submitted 2 weeks ago* (last edited 2 weeks ago) by Thoath@leminal.space to c/3dprinting@lemmy.world


[Solved] https://lemmy.world/comment/20394190

I've been fussing with this damn thing for two days, cleaned out the hot end, recalibrated it's level, messed with flow rate levels and layer thicknesses as I try to figure out this issue, currently on Merlin 2.0.6

I made the mistake of trying to encode Klipper into my machine (my mistake for I wasn't able to get it work as desired) and messed up the firmware in the process of trying to get it working from OctopiKlipperOS where it wasn't reading SD cards anymore, I don't know what firmware I was running on before, probably baseline ender 3 firmware for 4.2.2 from Creality

I've tried to update the firmware to maybe a better behaving version Marlin 2.0.6 in the course of this, my next step is to just try the original firmware again, but I've been trying to print with PHA newly here as well, but noticing an under extrusion issue where it'll create dollups to the idea of a wall. I'm wondering even IF the firmware could be the problem, do I need a new extruder head?

23


https://www.thingiverse.com/thing:7191309/files

Looks small. Around 1.25kg of filament + 0.5kg for a stand. 12 servos, Rπ 4, Arduino. No link to software that I saw, and no real pictures of a verified print. Model was posted to thingiverse November 5th 2025.

24


No affiliation here, I just came across FiberSeeker 3 and wondered what people think about it. The ability to do continuous fiber embedded printing really seems to step up the prints from prototype to actual functional parts.

I'm thinking it would be really cool to try printing some bike components, specifically a seat post setback adapter for my tall ass. I'm wondering if this type of composite part could take that kind of repeat shock?

25


New to 3D printing (my printer didn't even arrive yet) but I have a few projects I want to start with and I am unsure of the correct or best materials to use for them.

So here are three things I want to print for sure:

  1. Adjustable leg for IKEA BROR. This BROR rack already has a ton of stuff on it, likely in the 20 - 30 KG range so it would need to be a material that can stand that weight. It's also a garage so the expected temperature range is something like 30 to -5C
  2. Some counter top containers to hold things. One of the things I want to hold are laundry detergents. These can be a bit heavy and some detergent can spill, not sure if this can react with the plastic. Indoor use only so the temp range is like 25 to 20C.
  3. Mount plate for a post cap light. I will be screwing these into the post and then the light will lock on to them. The post cap light itself is pretty light however it needs to be able to withstand the elements (snow, rain) and also animals like raccoons and squirrels that might try to pry them off. Temp. range is like 30C to -30C.

If anyone has any suggestions please let me know!

view more: next ›